How I run my Jenkins cloud instance
Jenkins + helm template + kubectl apply -k
I have a few automation projects nearing the top of my to-do list (there is a lot of repetitive work to do when you post and sell art online... yikes!), so I recently dusted off my repo to turn my personal Jenkins instance back on. In updating it, I was reminded that it was a bit of process settling on a fully-declaritive solution I liked, so I wanted to make a post about what I learned in case anyone finds themselves walking down the same path.
Updating to the cloud
My Jenkins experience goes back to the non-containerized era, when I was serving on a team that managed a company-wide "old-school" Jenkins instance. When our machines neared capacity, our team would need to request a new VM, set it up manually, and ensure the proper dependencies were on the machine. Moreover, the monolithic Jenkins would routinely be in "plugin-hell", where so many plugins were installed on the same Jenkins instance, it began necessitating lengthy changelog review and testing processes before we could risk updating plugins, nevermind updating the version of Jenkins itself, which would be perpetually spewing out warnings like "deprecated" and "not secure".
Knowing containers provided a code-managed way out of some of the traditional maintainence headaches, I used an oppurtunity I had while supporting a smaller independent team to roll out a google cloud-friendly instance running on Kubernetes, which had me quickly settling on Helm.
I'll gloss some of the additional details because this youtube on 'The Jenkins Journey' will probably give you a better idea of how Jenkins will make a solution like Helm as its usage and needs grow.
Helm is nice, but...
Helm, being a tool that writes and deploys to Kubernetes, did make it easier to get Jenkins off the ground without having to know much Kubernetes, but customization quickly became a new bottleneck using it.
My existing experience configuring Jenkins started to make using Helm feel like putting the training wheels back on after already learning to ride a bike. I could usually get it to do what I wanted eventually, but it was arduous to keep solving the "how do I do this through the Helm config?" puzzle each time I needed to configure something new in Jenkins.
Moreover, what is Helm actually doing with the Kubernetes config? Since the k8s code Helm ultimately applies doesn't exist in the repository, there is no meaningful review process for Jenkins configuration changes unless another team member already knows what Helm will spit out. And wasn't a big reason I started down this path in the first place to get all configuration into my versioned codebase? While those are indirectly expressed in Helm's values.yaml file, it really starts to feel more like a pseudo-declarative project.
Kustomize is better
Thankfully, a friend pointed me to a newer tool, kustomize. I will again refer you youtube for more details, but the TLDR is that kustomize lets me organize my project like this:
jenkins
├── helm-base ╍╍╍╍╷
└── overlays      ╎
    └── gke-tom ╍╍╵
In this case, my helm-base folder holds a yaml config of what Helm
would deploy if I was still using it as a package/deploy manager.
The line on the right side connecting that folder to overlays/gke-tom is showing that
gke-tom inherits from helm-base and overlays the gke-tom code over it,
essentially inserting and replacing fields in the configuration that
aren't specified or contain different values in helm-base.
So in less-technical terms, helm-base becomes "the rest of the world's best-pratice default yaml config" of Jenkins, and overlays can be thought of as "our deviation(s) from it". Since it is a yaml to yaml operation, you can keep stacking overlays on top of one another, like if I wanted to build a helm-base > test > live inheritence relationship,
helm-base > in-house-base > *multiple-in-house-jenkins-instances, etc.
A basic example
So how does it work? Using the helm template command,
I can build the Jenkins helm-base folder after installing Helm
and pulling the Jenkins chart:
helm repo add jenkins https://charts.jenkins.io
helm repo update
helm template example jenkins/jenkins -n helm-base > helm-base/jenkins.yaml
Applying this configuration will get me the default Jenkins—a fully configured and runnable Jenkins instance that I could run as-is—but in order to demonstrate some of the kustomization I'll add a simple overlay:
# helm-base/kustomization.yaml:

resources:
  - jenkins.yaml

# overlays/example/kustomization.yaml:

namePrefix: demo-
namespace: temp
resources:
  - ../../helm-base

patches:
- target:
    kind: ConfigMap
    name: example-jenkins
  patch: |-
    - op: replace
      path: /data/plugins.txt
      value: |-
        github:latest
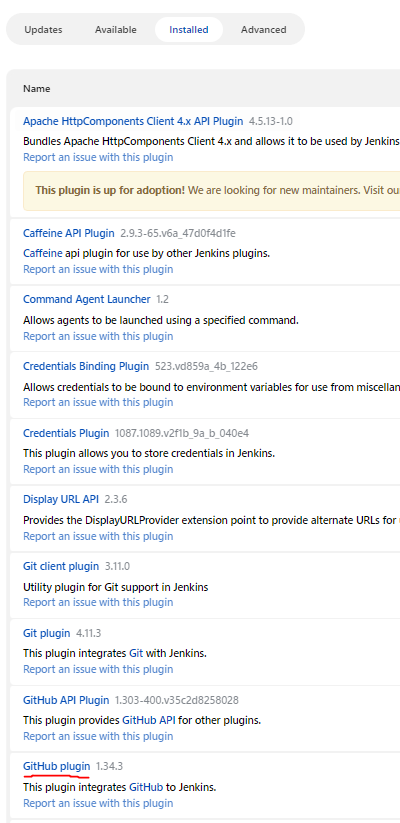
Here I am kustomizing the list of plugins by updating the file defined in helm-base. With the file in this ConfigMap swapped out, this Jenkins instance should come with the latest github plugin pre-installed. Finally, I apply it with the familiar kubectl apply, but use the -k flag, which will merge the base and overlays before sending the result to Kubernetes:
kubectl apply -k overlays/example
After signing on giving the pod a chance to start, I can hop on and verify the github plugin is there after the first startup:

Closer to the applied config
Kustomize puts the code in better peer review territory than the k8s-behind-the-curtains helm install approach. With a yaml-to-yaml solution that mirrors the applied Kubernetes config, the code that changes more frequently will be in that deviation-from-the-default overlays folder and it is much easier to see the impact on the applied configuration, which you can also print out with the kubectl apply -k --dry-run=server command.
I can also update base as often or as little as I want, like when I turn my Jenkins back on after some time away. A helm-base update is as easy re-running the helm repo update and template commands on top of a git branch and using the diff of the new base to adjust anything that changed out from under the overlays.